本章节将介绍一些 WSL 的进阶操作,包括高级互操作性、GPU 加速、硬件透传以及内核定制等,帮助你榨干 WSL 的性能。
🔗 高级互操作性
WSL 的核心优势之一就是 Windows 与 Linux 之间近乎无缝的互操作性。
🚀 跨系统调用文件性能
避免在不同操作系统之间使用文件,在 Linux 中工作,将文件存储在 WSL 中,在 Windows 中工作存储在 Windows 文件系统中。
Windows 文件系统在 Linux 是通过挂载的形式展示的以 /mnt/c 这种格式展示 C 是对应的 Windows 盘符。
Linux 文件系统在 Windows 下是以 \\wsl$ 展示的形式。
💡 常见例子
- Linux 文件系统目录:
/home/<user name>/Project - Windows 文件系统根目录:
/mnt/c/Users/<user name>/Project$或C:\Users\<user name>\Project。
📁 Windows 文件资源管理器中查看当前目录
可以通过从命令行打开 Windows 文件资源管理器来查看存储文件的目录。
explorer.exe .
powershell.exe /c start .
在 Windows 文件资源管理器地址栏输入 \\wsl$ 即可看到所有已安装的 Linux 发行版。

⚙️ 配置
wsl.conf 和 .wslconfig 文件用于在 WSL 中配置高级设置,wsl.conf 用于 Linux 发行版内部的配置,而 .wslconfig 用于全局 WSL 设置。
wsl.conf:位于 Linux 发行版的/etc/wsl.conf,用于配置 Linux 内部行为,如自动挂载、网络设置等。.wslconfig:位于 Windows 用户目录下(如C:\Users\<user name>\.wslconfig),用于配置 WSL 的全局行为,如内存限制、CPU 核心数等。
🔄 重启
虽然官方声称关闭 WSL 8 秒后会彻底关闭,但由于大部分开发者会使用 Docker Desktop 等工具,导致 WSL 进程一直在后台运行,所以建议在修改配置后执行 wsl --shutdown 来确保所有设置生效。
📄 wsl.conf
🔧 systemd 支持
大部分 Linux 发行版默认启用 systemd 支持,并不推荐关闭它,因为很多服务和工具都依赖 systemd 来管理进程和服务。如需打开,使用 sudo vim /etc/wsl.conf 添加以下内容:
[boot]
systemd=true
⚠️ 无需修改设置
建议不要修改自动装配配置、互操作性配置、用户配置、启动配置、GPU 配置、时间配置,如果需要请查看 配置 找到自己需要修改的。
🌐 网络设置
这些设置位于 /etc/wsl.conf 的 [network] 部分,用于控制发行版启动时的网络初始化行为。
| 配置项 | 数据类型 | 默认值 | 说明 |
|---|---|---|---|
generateHosts | bool | true | 设置为 true 时,WSL 将生成 /etc/hosts。该文件包含主机名与 IP 地址对应的静态映射。 |
generateResolvConf | bool | true | 设置为 true 时,WSL 将生成 /etc/resolv.conf。该文件包含能够将给定主机名解析为其 IP 地址的 DNS 列表。 |
hostname | String | Windows 主机名 | 设置要用于 WSL 发行版的主机名。 |
📝 示例
# Automatically mount Windows drive when the distribution is launched
[automount]

# Set to true will automount fixed drives (C:/ or D:/) with DrvFs under the root directory set above. Set to false means drives won't be mounted automatically, but need to be mounted manually or with fstab.
enabled=true

# Sets the directory where fixed drives will be automatically mounted. This example changes the mount location, so your C-drive would be /c, rather than the default /mnt/c.
root = /

# DrvFs-specific options can be specified.
options = "metadata,uid=1003,gid=1003,umask=077,fmask=11,case=off"

# Sets the `/etc/fstab` file to be processed when a WSL distribution is launched.
mountFsTab=true

# Network host settings that enable the DNS server used by WSL 2. This example changes the hostname, sets generateHosts to false, preventing WSL from the default behavior of auto-generating /etc/hosts, and sets generateResolvConf to false, preventing WSL from auto-generating /etc/resolv.conf, so that you can create your own (ie. nameserver 1.1.1.1).
[network]
hostname=DemoHost
generateHosts=false
generateResolvConf=false

# Set whether WSL supports interop processes like launching Windows apps and adding path variables. Setting these to false will block the launch of Windows processes and block adding $PATH environment variables.
[interop]
enabled=false
appendWindowsPath=false

# Set the user when launching a distribution with WSL.
[user]
default=DemoUser

# Set a command to run when a new WSL instance launches. This example starts the Docker container service.
[boot]
command=service docker start
🛠️ .wslconfig
使用 .wslconfig 为 WSL 上运行的所有已安装的发行版配置全局设置。
- 默认情况下该文件不存在,需要在用户目录下创建该文件。
- 用于在所有运行 WSL 2 版本的已安装 Linux 发行版中配置全局设置(不可用于 WSL 1)。
- 保存在
C:\Users\<UserName>\.wslconfig目录下。
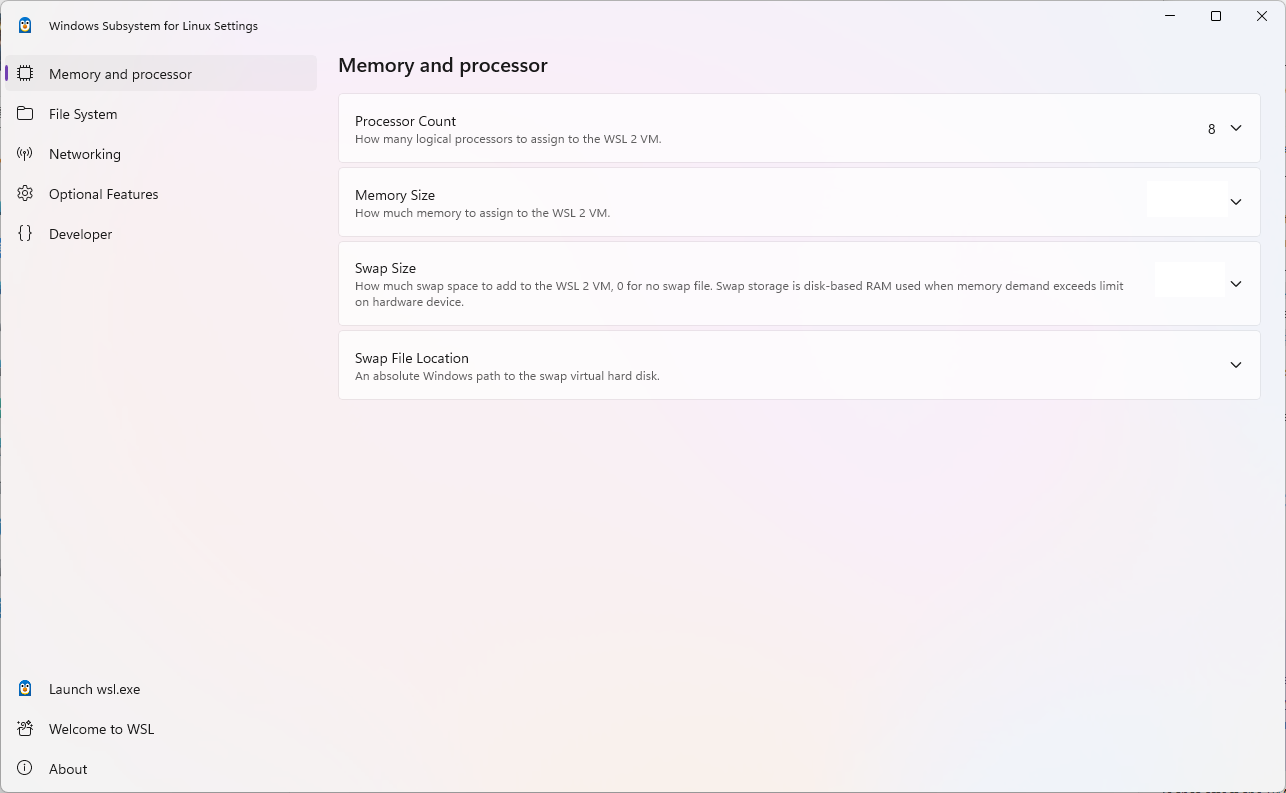
WSL 提供了图形化界面进行修改 .wslconfig 文件进行配置。
📋 示例配置
[wsl2]
# Settings apply across all Linux distros running on WSL 2
[wsl2]

# Limits VM memory to use no more than 4 GB, this can be set as whole numbers using GB or MB
memory=4GB

# Sets the VM to use two virtual processors
processors=2

# Specify a custom Linux kernel to use with your installed distros. The default kernel used can be found at https://github.com/microsoft/WSL2-Linux-Kernel
kernel=C:\\temp\\myCustomKernel

# Specify the modules VHD for the custum Linux kernel to use with your installed distros.
kernelModules=C:\\temp\\modules.vhdx

# Sets additional kernel parameters, in this case enabling older Linux base images such as Centos 6
kernelCommandLine = vsyscall=emulate

# Sets amount of swap storage space to 8GB, default is 25% of available RAM
swap=8GB

# Sets swapfile path location, default is %UserProfile%\AppData\Local\Temp\swap.vhdx
swapfile=C:\\temp\\wsl-swap.vhdx

# Turn on default connection to bind WSL 2 localhost to Windows localhost. Setting is ignored when networkingMode=mirrored
localhostforwarding=true

# Disables nested virtualization
nestedVirtualization=false

# Turns on output console showing contents of dmesg when opening a WSL 2 distro for debugging
debugConsole=true

# Sets the maximum number of crash dump files to retain (default is 5)
maxCrashDumpCount=10

# Enable experimental features
[experimental]
sparseVhd=true
🌐 网络配置
请修改成镜像模式,如果需要 NAT 模式,请参考 WSL 默认网络模式 NAT 进行查看。
🪞 镜像模式
该模式将 Windows 上的网络接口“镜像”到 Linux,以添加新的网络功能并提高兼容性。
- 支持 IPv6
- 使用
localhost从 Linux 内部连接到 Windows 服务器 - 改进 VPN 兼容性
- 多播支持
- 从局域网连接 WSL
在 PowerShell 窗口中以管理员权限运行以下命令,以配置 Hyper-V 防火墙设置,使其允许入站连接。
Set-NetFirewallHyperVVMSetting -Name '{40E0AC32-46A5-438A-A0B2-2B479E8F2E90}' -DefaultInboundAction Allow

New-NetFirewallHyperVRule -Name "MyWebServer" -DisplayName "My Web Server" -Direction Inbound -VMCreatorId '{40E0AC32-46A5-438A-A0B2-2B479E8F2E90}' -Protocol TCP -LocalPorts 80
🚇 DNS 隧道
通过 WSL 内的虚拟化功能响应 DNS 请求,而不是通过网络数据包请求 DNS。
🤖 自动代理
该功能会获取 Windows 上活动网络连接的代理设置,并自动配置 WSL 发行版中的环境变量。
📤 导入任何发行版
部分发行版没有在 Microsoft Store 中上架,但是也可以通过其他方式进行导出。
📦 获取 Linux 二进制 tar 文件
- 通过官网下载中下载对应的示例。
- 查找 Linux 分发容器,并将实例导出为 tar 文件。
📥 获取对应的 tar 文件
- 在 Docker 中运行容器
docker run -t --name wsl_export centos ls /。 - 将容器导出为 tar 文件并保存在 C 盘中
docker export wsl_export > /mnt/c/temp/centos.tar。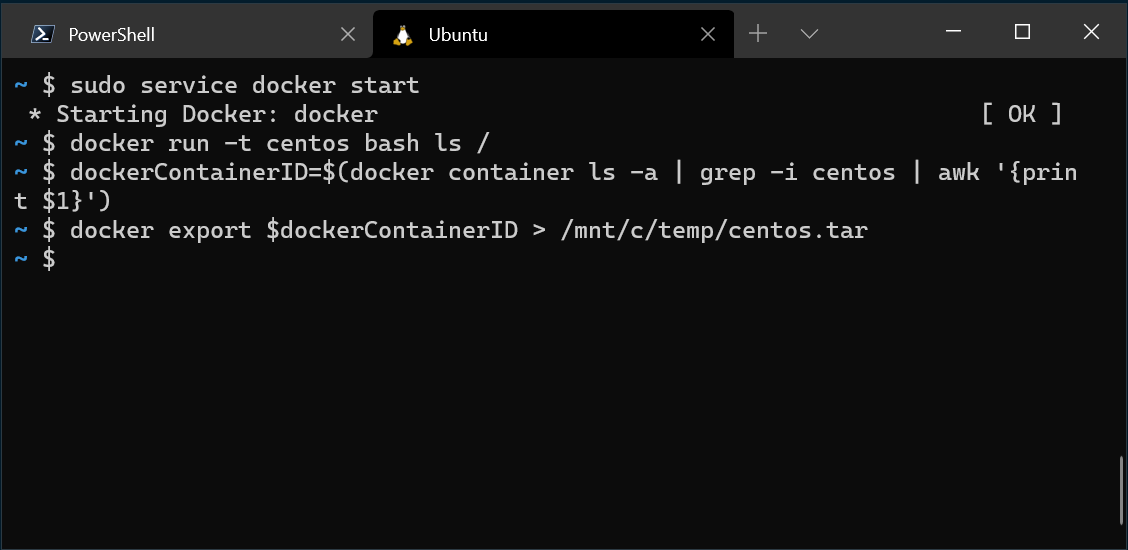
- 清理该镜像
docker rm wsl_export。
🚀 导入示例
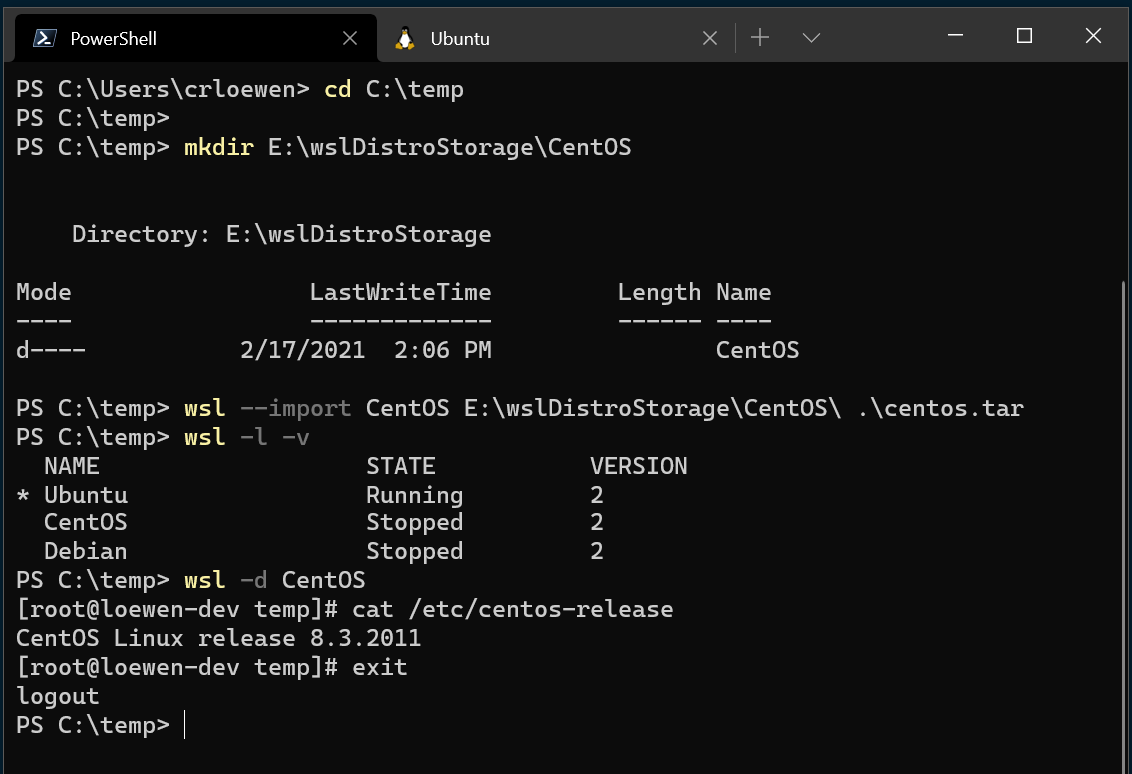
# 确保已创建保存的文件夹
cd C:\temp
mkdir E:\wslDistroStorage\CentOS
# 导入 tar 文件
wsl --import CentOS E:\wslDistroStorage\CentOS .\centos.tar
# 检查是否导入成功
wsl -l -v
# 运行新导入的发行版
wsl -d CentOS
🔩 配置
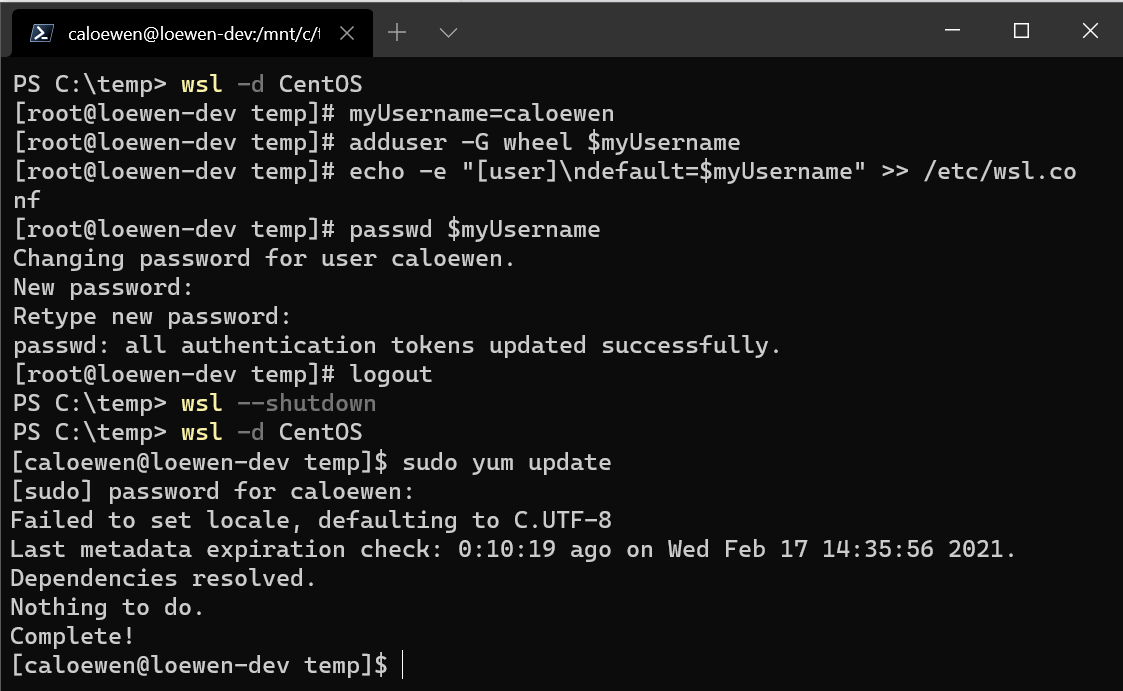
将 sudo 和密码设置工具安装到 CentOS 中,创建用户帐户,并将其设置为默认用户。
yum update -y && yum install passwd sudo -y
myUsername=caloewen
adduser -G wheel $myUsername
echo -e "[user]\ndefault=$myUsername" >> /etc/wsl.conf
passwd $myUsername
退出 WSL 实例,重新启动分发生效。
wsl --terminate CentOS
wsl -d CentOS